A Newcomer's Guide to Orienteering
Getting started in the world of orienteering can appear complicated to newcomers; it is not. This guide aims to tell you everything you need to know about starting orienteering. You may prefer to download a PDF copy of this article, please feel free to do so here.
Orienteering is an exciting outdoor adventure sport which takes place in varying terrain over various distances. The aim is to navigate in sequence between a set of control points marked on a unique orienteering map and decide the best route to complete the course in the quickest time. The standard orienteering distance is known as a ‘classic or long distance’ race however modernisation of the sport has introduced the ‘middle distance’ race and ‘sprint distance’ race. There are an increasing number of events in urban areas - try one!
A good way to get started would be to try a local permanent orienteering course. These courses can be located in a forest, local town or country park. Kerno helps maintain three permanent courses in Cornwall (details can be found here). If you feel like travelling further afield have a look at the Permanent Courses section of the British Orienteering website.
To experience the full excitement of orienteering you should attend an orienteering event, which usually take place on a Sunday morning. Here you will find lots of experienced orienteers who will be able to help you get started.
Types of event
There are four types of orienteering events from Level A to Level D. Level A events are Major Events such as a British Championships, Level B events are high quality competitions for people wishing to travel, Level C events attract participants from around the local Region and Level D events are usually aimed at participants in a 'localised' area such as a town park. Level C and D events are ideal for newcomers. At some events, very young children may also be able to take part on a string courses, where they may have their own map and literally follow a line of string which takes them around a set of controls marked by fun characters.
Courses
Courses are graded according to their length and technical difficulty - usually identified by a colour. The courses provided will depend on the location of the event and the anticipated levels of skill and experience of the participants.
The colours shown in the table (white – very easy to black – very hard) relate to the length and navigational difficulty of the colour-coded courses offered at Level D and C events. A youngster would be expected to start on either the white or yellow course, whilst an adult novice would begin with either the yellow or orange course, depending on their confidence. The Organiser may also put on other courses to better suit the participant’s needs; e.g. a long easy course.
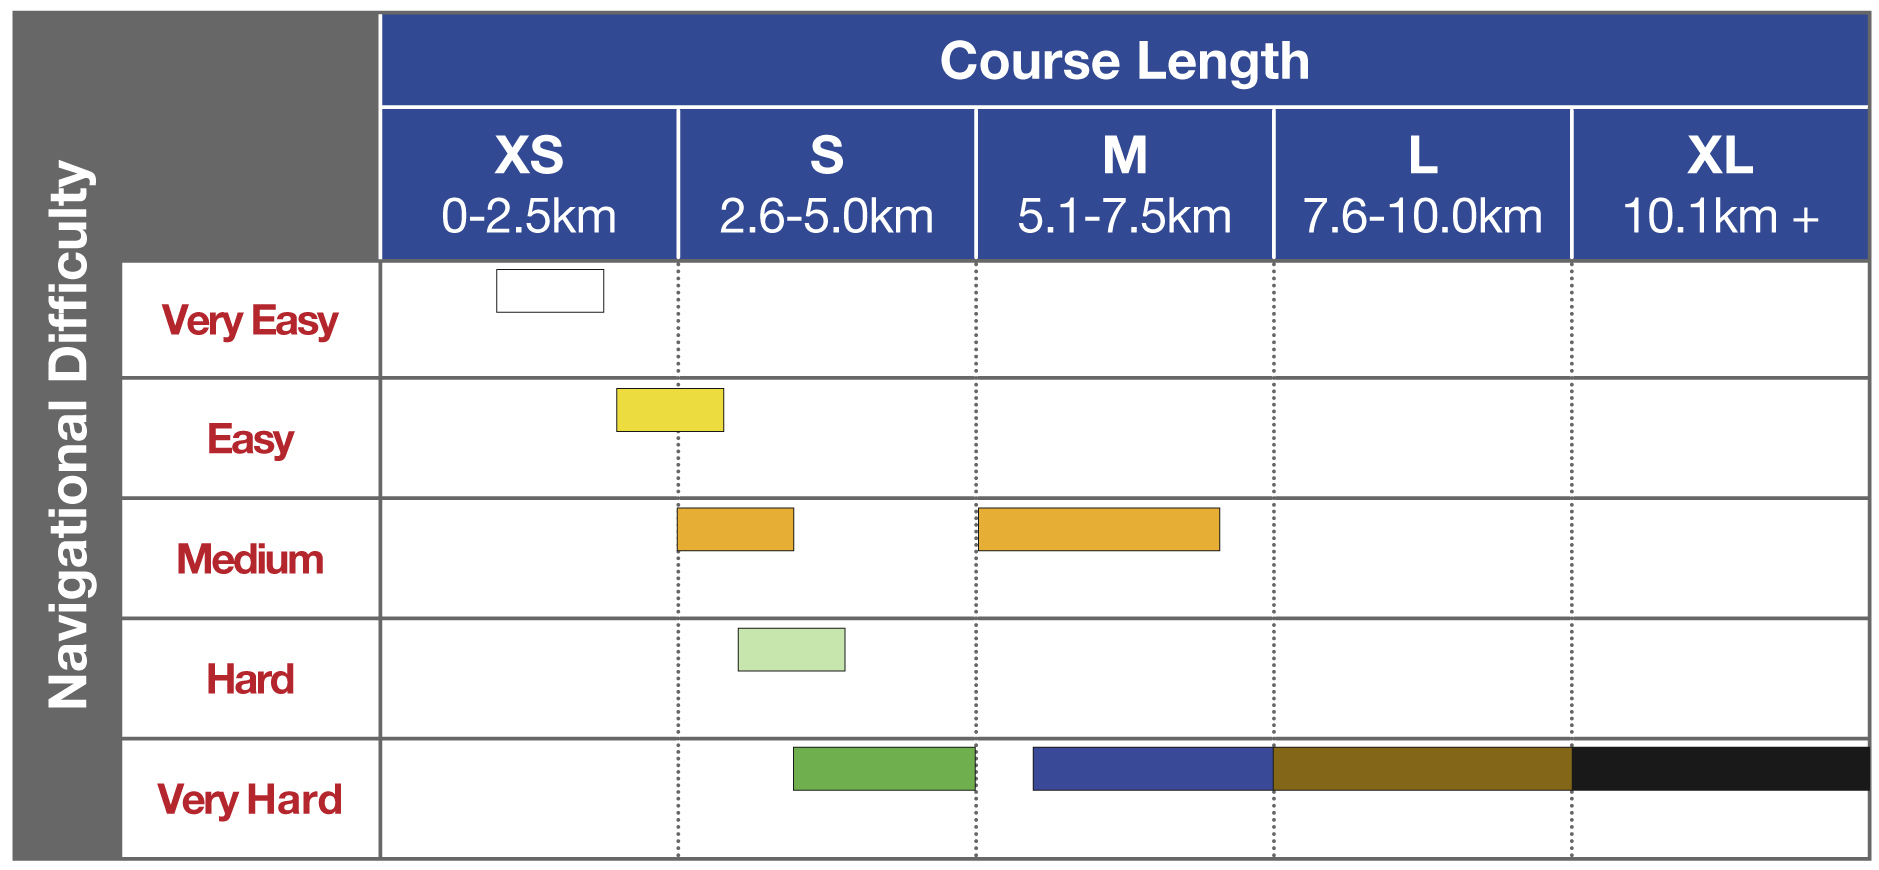
A competitor’s progression can then be made either towards longer courses with the navigation remaining the same, or on to courses with more challenging navigation, up to the appropriate length for their fitness.
--White Courses (XS) are very easy with all controls on paths. They are mainly used by 6 - 10 year olds and family groups.
--Yellow Courses (XS-S) use simple linear features like paths, walls and streams. They are mainly used by under 12’s and family groups.
--Orange Courses (S-M)) progress to basic use of the compass and route choice. They are ideal for novice adults or experienced youngsters. Long Orange courses are used mainly by novice adults wanting a longer run.
--Light Green Courses (S) Light green courses are ideal for improvers as the technical difficulty begins to increase and uses simple contours and ‘point’ features.
--Green Courses (S) are used mostly by experienced under 18’s and adults wanting a short but challenging course with a very hard navigational difficulty. There may be a Short Green course aimed at those competitors who want all the challenges of a Green course without the more physical obstacles that may be present in the terrain.
--Blue Courses (M) are a longer, more physically demanding course in comparison to the Green. The distances are more varied between controls and the course attracts experienced orienteers.
--Brown (L) and Black Courses (XL) are very physically demanding and have a very hard navigational difficulty. They are for experienced orienteers only.
Age Classes
Courses can also be classified by age class. Your age class is determined by your gender and how old you will be on the 31st December of the year of the competition. So even if, for example, your 40th birthday is not until December, your age class will be M or W 40 from the January of that year. (The M/W refers to Men or Women.) There will also sometimes be Elite (E) classes available in M/W18, 20 and 21.
| Your Age | Your Age Class |
|---|---|
| 10 and under | M/W10 |
| 12 and under | M/W12 |
| 14 and under | M/W14 |
| 16 and under | M/W16 |
| 18 and under | M/W18 |
| 20 and under | M/W20 |
| Any Age | M/W21 |
| 35 and over | M/W35 |
| 40 and over | M/W40 |
| 45 and over | M/W45 |
| 50 and over | M/W50 |
| 55 and over | M/W55 |
| 60 and over | M/W60 |
| 65 and over | M/W65 |
| 70 and over | M/W70 |
| 75 and over | M/W75 |
| 80 and over | M/W80 |
Going to an Event
Once you have found a suitable event on the fixtures list you need to locate the venue. The grid reference for the event car park will be shown as a link in the fixtures list. Sometimes there will be specific directions to an event which will often explain how to get to a certain point on a major road, and then tell you to follow the orienteering signs. These are arrows, usually hung from posts or fences, which point the way to the car park. They may say 'Orienteering', or 'O', or just be marked with the orienteering symbol, which is a square divided into red and white triangles. The car park will often turn out to be a farmer's field, and may well be off the main road and down narrow lanes. Keep following the arrows until you see marshals who will show you where to park.
The fixture list details should include the time of the event. Times may vary from club to club but Cornwall OC Sunday morning events normally have start times between 11.00am and 13.00pm, with courses closing at 3.00pm, and event entry from 10.30am until 12.45pm. There will normally be an enquiries point or someone wearing a tabard that says ASK ME, so if you have any questions, however trivial they may seem, just ask.
What you will need to orienteer
Comfortable clothes for walking or running in, that you don’t mind getting dirty. Competition rules will normally require full leg cover (that means shorts aren’t appropriate). You can also buy specially designed orienteering clothes, which offer full body covering but remain lightweight and breathable. Consider bringing a lightweight waterproof, if the weather forecast is poor. For footwear, trainers or walking shoes will normally be fine, but preferably waterproof ones and with a good grip. There are specially designed orienteering shoes available which are studded lightweight running shoes. Prices of these range from £60 - £100. You will also need to bring some money for your entry fee - about £10 for non-members. A compass is always useful, but not strictly necessary if you are orienteering on a White, Yellow or Orange course. You may be able to buy a compass at the event, if you want one - the club has a shop which has small items for sale. A safety whistle is sometimes compulsory, especially in difficult terrain, but you can usually buy that too, if you need to. Generally at all Kerno events the maps will come pre-printed on waterproof paper, but it is advisable to bring a red pen and a clear plastic A4 sized bag just in case.
Entering the event
Since the restrictions that were imposed because of Covid-19, most events now operate a system of on-line pre-entry.
What to do when you arrive
The first thing to do is register, i.e. enter the event. This might be somewhere indoors, a car, or a tent, easily identifiable as the centre of activity in the car park and will normally have a ‘registration’ or ‘enquiries’ sign outside of it. Registering is normally a two stage process: payment and putting the information about your entry onto the event computer.
At registration there will be some sort of sign detailing the length, the height to be climbed and the technical (navigational) difficulty of each course. Children who have not orienteered before should enter a White or Yellow course, and be accompanied by an adult who can help them with the map. Adult novices might want to start with the Orange course, which is the longest course before the technical difficulty increases. If you complete your first course quickly and successfully it is often possible to try another if there is enough time and available start times.
Once you have chosen the course you would like to participate in, you can complete the registration process. Every competitor on each course has their own start time, so you will first be asked what time you would ideally like to start. You should ask how far it is to the start and allow yourself plenty of time to get there. Many events are flexible about the start time and you will be allowed to leave the start at the discretion of the start official. You will be asked your name, your club (not compulsory) and your age class. Although you will be asked your age class at all events, you will usually only compete in your age class at Level C events and higher.
Punching
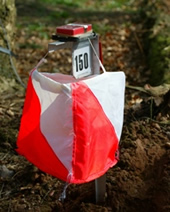
To complete the orienteering course you need to prove that you visited each control and to do this you need to "punch". Punching a control registers that you have visited the control and is usually done through an electronic device, sometimes called a "card".
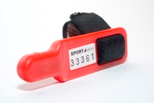
An electronic "card" is used to confirm that you have visited all the controls in the correct order. Calling it a "card" is a bit of a misnomer as it is really a microchip housed in a plastic case; sometimes it has extra features like a clock. The "card" is the size of your finger or palm and attaches to your finger with an elasticated, adjustable band. The "“card" is used as a timing device and also logs the time you visit each control so you are able to view your ""splits" after you have finished. This is useful as you can compare yourself against other competitors.
There are two main brands of electronic cards, Emit and SportIdent. Cornwall OC uses the SportIdent system. With this system the control boxes have a hole in them and the electronic card is activated by putting it into the hole in the box. SportIdent - SI - cards are usually referred to as ""dibbers". You are able to purchase your own electronic cards, but the cost varies from £30 - £60 so it is probably only worth buying one if you start orienteering regularly as you are able to hire one at each event. If purchasing your own electronic card you would also need to decide which brand to purchase depending on which brand is used at the majority of events you go to.
Starting the Course
Most events now pre-print courses onto the maps which you collect after punching the Start box. At some events there will be a map of the competition area to look at before the start. This allows you to build up some sort of picture of the terrain you might encounter. Any unfamiliar symbols will be explained in the legend. You might also want to note the map scale and the contours, to get some idea of how far things are, and what is uphill or downhill, and how steep it is. These details can be useful but you don't strictly need them if you are doing one of the simpler courses.
Normally competitors on a White or Yellow course are given their map before the start, often at registration. This makes it less confusing for children, and gives adults more time to explain to them what they need to do.
At the Start
The way to the start should be indicated by arrows, tapes hung from trees, or a steady procession of competitors in running clothes. Try to arrive at the start at least 10 minutes before your start time, because you may be called a few minutes in advance and depending on how hard you intend to race, a warm up is always a good idea..
If you are using electronic punching you will need to clear the card of its previously stored event details at the Clear station – hold the device in the box until the box beeps. A start official will ask you to check that your card is clear by inserting the card into the Check box.
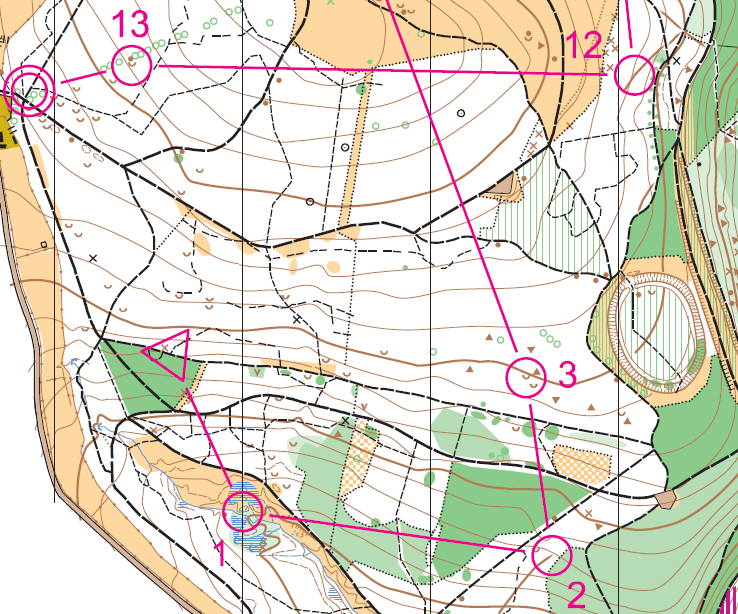
At the start whistle, or an instruction from a start official, or a beep from an electronic clock you leave the start line and punch at the Start box – this action starts the timing for your run - and you then pick up a map for your course. The triangle on the map marks the start point and there will be an orange and white orienteering banner/flag/kite indicating where the start point is on the ground. On some occasions you may need to follow red and white tape to the start kite - once you arrive at the kite you are at the triangle on the map. The numbered circles on your map indicate the controls you need to find, in the order you need to find them. The straight lines joining the circles are to indicate which is the direction of the next control. You must find the best route, for you, between the controls.
The control description sheet tells you what you are looking for, e.g. a path junction, a large boulder, or a ditch end. When you find the control there will be some letters or numbers which should correspond to those on your control description sheet. If they match, you have found the right place. If they don't, it isn't your control!
The control description sheet uses a set of internationally agreed symbols, but for White and Yellow courses the descriptions are in English. An explanation of the structure of the control description sheet and the list of the symbols can be downloaded as a pdf here.
The double circle on the map indicates the finish where you must punch your electronic card.
At the end of the race, having punched all the controls and the Finish you are required to download the information which is on your electronic card. If you do not download the organisers will not know whether you have finished or not and you won’t appear in the published results.
Please remember that whether you visit all the controls or not, you must always report to the finish. This is the golden rule of orienteering, preventing unnecessary searching for missing competitors. Your co-operation will be appreciated.
Orienteering Maps
Orienteering maps are drawn to a large scale, most commonly 1:15000 (1cm=150m) or 1:10000 (1cm=100m) but for orienteering in parks you might use a map drawn to an even larger scale of 1:4000 or 1:3000. All maps use an internationally agreed set of symbols and these are logical and easy to learn. You will absorb much of the information simply by attending your first few events. Most orienteering maps will also provide a detailed legend to help you understand the map.
Here is an example of a map at Lanhydrock - continuously evolving.
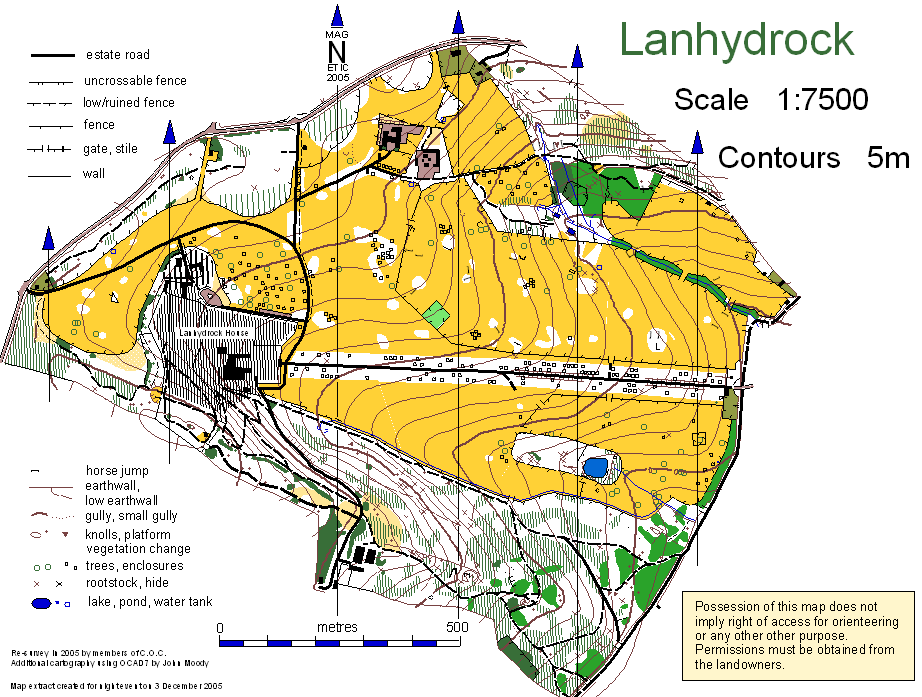
Orienteering maps are drawn using magnetic north rather than grid or true north, and are printed in up to five standard colours. The colours are an integral part of the map symbols. Black is used for most man-made features such as buildings and rock features such as cliffs, crags and boulders. Brown is used to show landform, including contour lines, gullies, pits and knolls (small hills). Blue is used for water features such as lakes, ponds, marshes and streams. White and Green are used to depict the density of woodland and the extent to which it impedes progress. Open runnable woodland is left white with progressively darker shades of green indicating increased density, ranging from slow run to difficult (or walk) through to impenetrable(or fight). Yellow is used for un-wooded areas with solid yellow for grassy spaces such as playing fields and a paler yellow for rougher terrain (rough open) such as heather. Combinations of yellow and green show other types of terrain which will be explained in the legend.
The map is usually updated as time goes by as trees grow or are felled. The changes can be extensive or subtle as the event officials study the map in more detail around each control site.
Acknowledgement
We are indebted to British Orienteering for reproducing part of the website in the following pages for your information. Any modifications that have been made to the original text are solely the responsibility of Cornwall Orienteering Club. The maps inside the booklet are the copyright of Cornwall OC but we acknowledge the appropriate licences issued by Ordnance Survey if appropriate.
Control Descriptions
For a full explanation of the symbols used for control descriptions download this document here.
Top Tips for Beginners
Below are five basic skills that you need to practice to help you progress with orienteering.
Fold your map - Always make sure that you fold your map so that you can easily see the part of the map where you are.
Orientate your map - Always make sure that your map is the correct way round or orientated. This means that the features which are in front of you on the ground are in front of you on the map. You can also orientate your map using a compass by making sure that the north lines on the map point the same way as the north or red end of the compass needle. Each time you change direction you should change your grip on the map so the map is still orientated north
Thumb your map - To help you know where you are on the map it helps if you mark your position on the map with your thumb. As you move along the ground you should move your thumb to your new position on the map. It is usual to move your thumb to the new position at a "Check Point" such as a path junction or some other obvious feature where you will stop or slow down and check where you are.
Check your control code - Once you have found a control you always need to check that the code on your control description sheet matches the code on the control. You should also check that the control is situated on the correct feature on your map. You will then know for sure that you have reached the correct control.
Have fun and enjoy yourself - This is the most important skill to remember. Orienteering should always be fun and enjoyable!